![]()
![]()
![]()
![]()
![]()
![]()
![]()
![]()
![]()
![]()
![]()
![]()
![]()
![]()
![]()
![]()
![]()
![]()
![]()
![]()
![]()
![]()
![]()
![]()
![]()
![]()
![]()
![]()
![]()
![]()
![]()
![]()
|
Photo Tips |
||
|
for beginners and seniors |
||
|
Last edited on 25/02/2016 Pictures may be
used for non-profitable purposes as long as the source is recognized: Background By using a zoom lens, one can blur the background and make the subject stand out more vividly. A combination of wide lens-opening and high speed has the same effect. My old film camera was better at it than my digital one. Originals taken on Kodak film with Exaktar zoom lens. Slides digitalized by Olympus FE-240 or HP Scanjet 3970.
The LORD God took the man and put him in the Garden of Eden to work it and take care of it (Gen. 2:15).
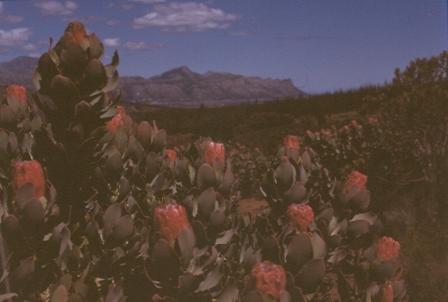
Sometimes the blue sky can accentuate contrasting colors:
Composition Take pictures from various angles and various zoom adjustments. With digital, it does not cost extra. However, erase unwanted ones as soon as possible to prevent confusingly large photo files. When originals are taken in high density, composition can later further be improved by the crop function (available in Microsoft Office Picture Manager). Alternating wide angle and close-ups makes your slide-show more interesting and informative.
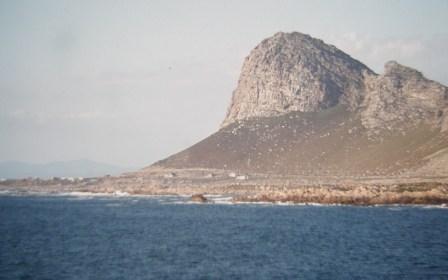
Instead of putting the main subject in the middle of the picture, rather use the one-third rule: put vertical objects one-third from left or right, and horizontal ones one-third from top or bottom. Try to balance left with right and top with bottom. In the picture below (left), there are four horizontal triangular scenes: foreground, sea, mountains, and air. The two triangles pointing to the left (foreground and mountains) are balanced by the two triangles pointing to the right (sea and air).
Follow it up with a zoom-in of the round peak. The zoom-in of the peak above (right) maintains the one-third rule. Foreground and background highlight the peak.
Pictures may be used for
non-profitable purposes as long as the source is recognized:
Film versus Digital I was rather reluctant to replace my 35 mm camera with a digital one. I had to convince myself digital was really better. I took a series of pictures with both cameras, using a tripod. Digital triumphed with flying colors. The picture is sharper, and the colors more realistic. Compare the color and sharpness of the water and leaves in these pictures (1 = digital, 2 = film):
Compressing or resizing pictures To compress pictures for e-mail, use Microsoft Office Picture Manager. Sending up to ten pictures is okay with document size; it reduces space considerably but still gives a clear picture. If you have more than 10 pictures, use web or email format. Showing high density pictures on your television set is a waste of time. As the TV has only limited lines and columns, the CD player has to reduce the size of the pictures. That's why large-size pictures load slowly on TV. To reduce the size of several hundred pictures at once, use the program that came with your digital camera. My Olympus program do that fast and efficiently. Before you resize en masse, make a copy of your original picture file, and work from the copy.
Save memories by digitalizing old photos, films, and videos. Transferring slides (color positives) to CD/DVD From 1950-80 color slides were popular. One had to put up a slide projector and screen to show them to friends. After that, color pictures became more popular because one could share them anywhere with a friend by means of an album. Still later digital cameras took over because they made sharing via the Internet easier.
If money is not a problem, you can have your slides transferred to CD by a professional. You may do the job yourself by means of a scanner with slide-scanning capability (it's a long, slow, frustrating process -- about 2 to 3 minutes per slide). You may speed up the process with the help of a digital camera with super-macro function, able to photograph a color slide. With a simple apparatus it will take about 30 seconds per slide: six times faster than a scanner. All the photos above (except for one) are 35 mm color slides copied by a small digital camera. By pointing the camera straight at the window or to the wall you can vary the amount of indirect sunlight shining through the slide. Some old, dark slides can be revived to quite acceptable standard. The first one below is from a scanner (this is how the slide actually looks), and the second is a copy of the slide made by the digital camera (this is how the scene actually looks).
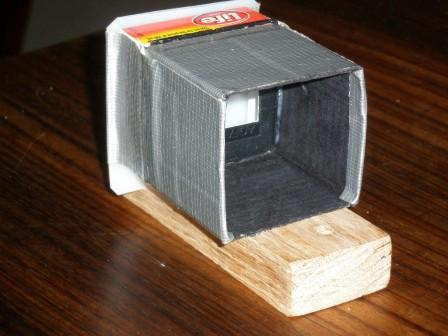
With a piece of wood, a milk bottle, a cough syrup box, and duct tape you can built a gadget to transfer slides to CDs. The camera is fixed on the plank by a bolt, the box by glue, and the milk bottle pieces by a slit in the wood. The box eliminates light from the sides. The milk bottle pieces diffuse light from the front. You have to experiment with distances because cameras differ. My mighty slide-converter looks like this:
Transferring color negatives to CD/DVD Because slide projectors could not compete with television, I switched in the 1980's to color photos that I could show to family and friends in an album. I recently discovered that many worthwhile pictures are not in my albums but hidden as color negatives in a drawer. My old HP scanner was not up to the task. I got a Canoscan 9000F which delivers excellent quality and scans 12 color negatives at a time. There is more expensive stuff on the market that scans 30 negatives at a time, but if your budget is limited like mine, the Canoscan 9000F is a good option.
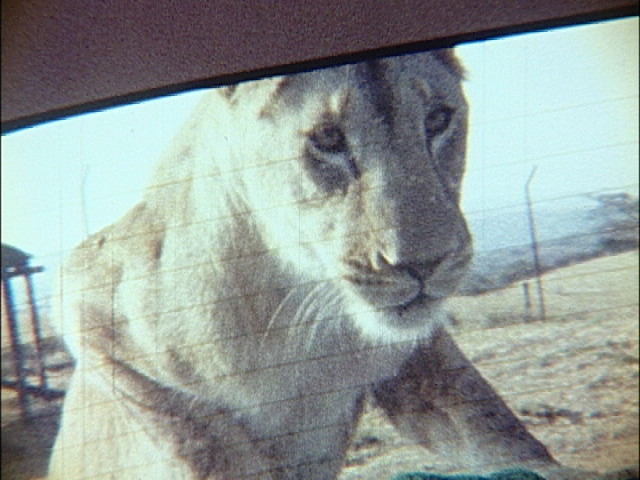
Transferring home movies to MiniDV and DVD The home-style method (using Super8-projector and camcorder) is not commendable. Because Super8 runs at 18 frames per second (fps), a NTSC camcorder at 29 fps, and a PAL camcorder at 25 fps, you will end up with a video or DVD that has lines running horizontally up or down on the screen. A Web search for "film to video" will show many sites offering this transfer service. Beware! Transfers are not created equal. Do your homework well. I found valuable information on two sites in particular: www.film-to-video.com ("dirty little secrets") and www.sunrayvideo.com ("film to video transfers"). Home movies filmed 30 to 50 years ago are now approaching the end of their life span. Save those family memories NOW by having those films transferred to MiniDV and DVD. Get both formats. DVD is handy to show on your TV, but MiniDV is better for editing (you must have a MiniDV camcorder). Copy the MiniDV's to all the hard disks you have. With some camcorders or movie making software you can take still photos from the MiniDV, such as the lion below, having a peek through the rear window of our car--too close for comfort! (Original taken by Canon Super8 film camera. Film transferred to MiniDV by Sunrayvideo.com. Single frame taken from MiniDV by Canon ZR45).
Industry still don't know how long the different media will store your valuable data. Once you have digitalized photos, slides, and movies, you can transfer them easily to newer technology as it becomes available. When the TV programs are lousy, my wife and I put a home-movie-DVD in the player and enjoy flicker-free viewing without the hassles of an old Super8 projector. Transferring VHS to MiniDV and DVD VHS videos don't last forever. The tapes may stretch, fold or break; the magnetic layer on the tape (that stores the data) may deteriorate with repeated use, or electrical motors of appliances (fans, drills, or vacuum-cleaners) may adversely effect the stored data on the tape. Copying an analog videotape to another always diminishes quality. That's one of the benefits of digital storage: copies are exact replicas of the original. Transfer your family memories from VHS to digital format (hard disk, MiniDV, and DVD), and save them for future generations. I received excellent service and reasonable prices from worldvideo@juno.com Digitalize your old photos, films, and tapes for continual enjoyment! ~~~~~~~~~~
|


 Copy by Scanner
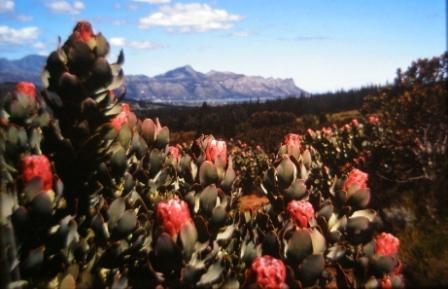 Copy by digital camera